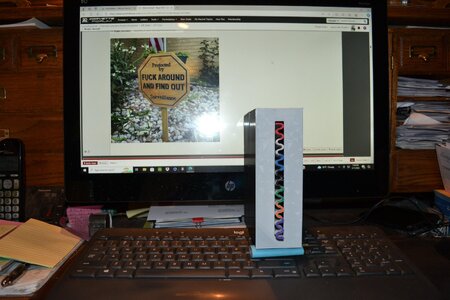
This is Vertical Germination

man this thing is huge!!!! it's like texas sized!!!!!!

i printed out the cover and wavy piece... still have the body and rez to go.

i got the heat pad. i saw there were a lot of other ones available but not too many in 4 watt most were only 2 watt. i assumed i would need the bigger one in my igloo.

31 hours on the body... i think that will be my longest print yet. what can go wrong.... ha! i'm going to try tree support for the first time too!!!

i can't even imagine how long that truck is to print. any chance you drew a rez that's not an 18 wheeler? not that it ain't badass, i just don't think my printer is big enough!!!
 
Think about using a small pump to move water through the VG.
What would work best is called a vacuum pump.
I know a good brand but it is discontinued and now like 5-7 times original cost.
https://www.amazon.com/Tom-Aquarium-Products-Lifter-Vacuum/dp/B00BXUZWUY/ref=sr_1_1?crid=XMAC403R9RMM&keywords=toms+aquarium+aqua+lifter+pump&qid=1698358615&s=pet-supplies&sprefix=toms+aquarium+aqua+lifter+pump,pets,169&sr=1-1-catcorr
Can't say GPH but it flows slowly through a standard airline for fish tanks.

i really like this idea man, i'm runnin' with it!

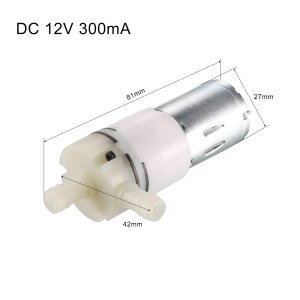
i'm going to try a small dc pump they use in k-cup style coffee makers... it was $16 for the pump so i'll give it a try.

61ZXVvV3OJL._SL1500_.jpg

i drew a rez with fittings to circulate the water. i gotta make it a little smaller though because it won't fit on my printer then i just need like 30 hours to print it out!! haha

i think the extra 02 it will create would be great for germination and worth the experiment.

🙃:)🙃
 
man this thing is huge!!!! it's like texas sized!!!!!!

i printed out the cover and wavy piece... still have the body and rez to go.

i got the heat pad. i saw there were a lot of other ones available but not too many in 4 watt most were only 2 watt. i assumed i would need the bigger one in my igloo.

31 hours on the body... i think that will be my longest print yet. what can go wrong.... ha! i'm going to try tree support for the first time too!!!

i can't even imagine how long that truck is to print. any chance you drew a rez that's not an 18 wheeler? not that it ain't badass, i just don't think my printer is big enough!!!
This has me cracking up because it's often hard for me to realize just how big I'm making something until it prints out.
I agree it's very oversized but I still ran with it after those long print times I didn't want to go to waste.🥴
When I find time I'll downsize all of it to be a bit more practical for all the folks outside of Texas.:cool:
Couple cool rez designs I'm kicking around is the NASCAR logo and a race car print😉


I got Ozarka, Hill Country Fair, HEB, down on the coastal bend! Just sayin. SSgrower

st,small,507x507-pad,600x600,f8f8f8.jpg


Think about using a small pump to move water through the VG.
What would work best is called a vacuum pump.
I know a good brand but it is discontinued and now like 5-7 times original cost.
https://www.amazon.com/Tom-Aquarium-Products-Lifter-Vacuum/dp/B00BXUZWUY/ref=sr_1_1?crid=XMAC403R9RMM&keywords=toms+aquarium+aqua+lifter+pump&qid=1698358615&s=pet-supplies&sprefix=toms+aquarium+aqua+lifter+pump,pets,169&sr=1-1-catcorr
Can't say GPH but it flows slowly through a standard airline for fish tanks.

i really like this idea man, i'm runnin' with it!

i'm going to try a small dc pump they use in k-cup style coffee makers... it was $16 for the pump so i'll give it a try.

View attachment 27456

i drew a rez with fittings to circulate the water. i gotta make it a little smaller though because it won't fit on my printer then i just need like 30 hours to print it out!! haha

i think the extra 02 it will create would be great for germination and worth the experiment.

🙃:)🙃

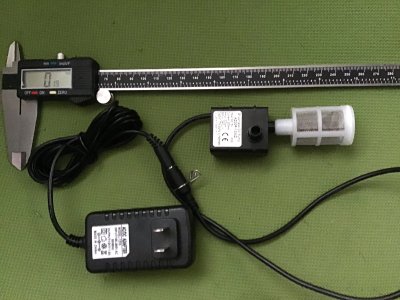
Among the weird things that were included in my strawberry tower like cotton seed starter cubes and 1 gallon fabric grow bags was this pump

IMG_5747.JPG

Past experience with pumps like this for my wife's little indoor table top fountains is very poor. They don't last very long and just a little debris in the water can kill them but I think it would be perfect for what Y'all are talking about and also making a VG into a cloner. When I get into designing that it will be centered around this pump in the rez
I'm seeing some on amazon for >$10 and some are even USB powered.
Reliability is highly questionable though so going this route I'm tempted to put the pump inside a rosin bag and ziptie it closed to try and prolong it's life because I've never seen one last over a year. Lifespan is somewhere between 1 week and 9 months and it's best to use bottled water that will not have any scale or other residue that can kill it
 
This has me cracking up because it's often hard for me to realize just how big I'm making something until it prints out.
I agree it's very oversized but I still ran with it after those long print times I didn't want to go to waste.🥴
When I find time I'll downsize all of it to be a bit more practical for all the folks outside of Texas.:cool:
Couple cool rez designs I'm kicking around is the NASCAR logo and a race car print😉


View attachment 27517


Among the weird things that were included in my strawberry tower like cotton seed starter cubes and 1 gallon fabric grow bags was this pump

View attachment 27518

Past experience with pumps like this for my wife's little indoor table top fountains is very poor. They don't last very long and just a little debris in the water can kill them but I think it would be perfect for what Y'all are talking about and also making a VG into a cloner. When I get into designing that it will be centered around this pump in the rez
I'm seeing some on amazon for >$10 and some are even USB powered.
Reliability is highly questionable though so going this route I'm tempted to put the pump inside a rosin bag and ziptie it closed to try and prolong it's life because I've never seen one last over a year. Lifespan is somewhere between 1 week and 9 months and it's best to use bottled water that will not have any scale or other residue that can kill it
We had a few indoor waterfalls With these. The pumps just die. Less than two years even with quarterly cleaning & distilled water. 🤷‍♂️
Hope you find a better way to prolong them. 👍
 
Got to give mine another try. Veggies need popping too.

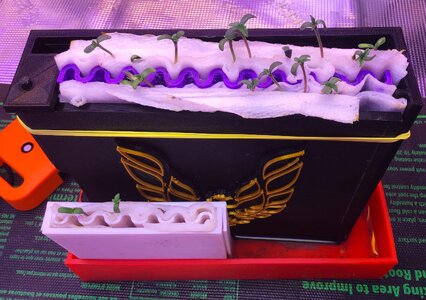
Peppers do great in a VG

IMG_6698.JPG

Same thing with cannabis seeds apply...Set the seeds at about 1/4" down and keep moist.
Every plant I've tried has worked great but cucumbers, melons, and squash sprouts can be a little grabby since the tap root fishbones rather early causing them to stick to the paper.
With those plants, as soon as you see a head rise up, go a head and plant it before it gets too clingy in there
 
I’d never used one before. It didn’t like staying together so I had to be gentle with it. I must be a complete dumbass as two seeds look liked they tried and then rotted. The rest did nothing. All we’re old vegetable seeds. Unless the basement gets to 20* and no more chills I don’t do well.

I also didn’t use enough paper towel. PC sent me the link to the germinator how-to a while back so I’ll read that again first.

I grew up using paper towels in sandwich bags. Shot glasses I learned later. I know this will be great once I get the hang of it.

If it doesn't stay together a rubber band works great to keep it together.
Generally, a minimum of two layers of paper towel on each side of the seed does the job but you can go with as many as 4 sheets.

Basically put the paper down on the corrugated piece and get it soaking wet.
Work the paper into the channels so the grooves are well defined.
Add your seeds.
Cover the seeds with at least two more sheets
Next, take the smaller cover plate and put it over the paper then flip it over.
Repeat the process then close it up with the second cover plate.
Stand on end in shallow water and you'll have sprouts starting in 2-3 days emerging from the open top
 
Got some printing right now for giveaways at the 420 event CannaGranny is sponsoring. We are trying to bring in some new members, and probably get pretty high in the process.

Any other cool dodads you can think of for mostly non-growers at a weed festival?
 
i went 12 for 12 on my last batch a couple weeks ago... i'll never go back to any other way.

View attachment 54728


Your mapping to coordinate multi strain drops always gets my wheels turning.

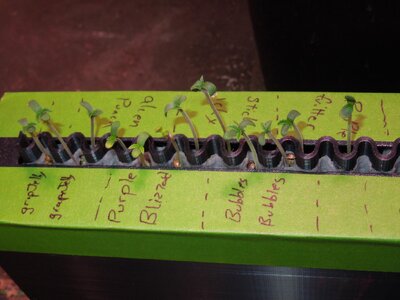
I'm bouncing around the idea of color coding the wavy insert. Instead of one big panel, several panels of 3-5 channels each and each panel is a different color. Then you just have a color code on the wall to match up strain to color that, for example, lets you know what's dropped in a blue section is bubbles. Purple could be purple blizzard and so on.

🔥


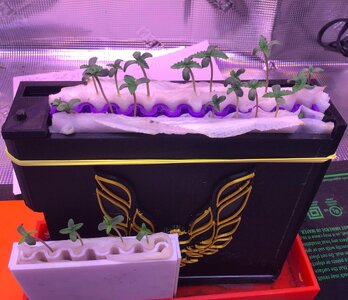
Reminds me of rows of miniature palm trees. 🌴🌴🌴🌴🌴

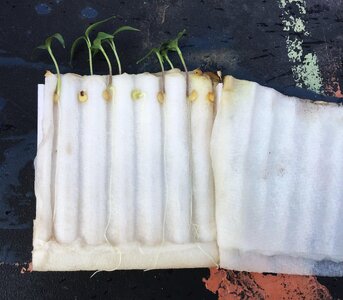
Not 100% are up yet but I gotta open these up and get what's ready, planted

IMG_7017.JPG
 
If it doesn't stay together a rubber band works great to keep it together.
Generally, a minimum of two layers of paper towel on each side of the seed does the job but you can go with as many as 4 sheets.

Basically put the paper down on the corrugated piece and get it soaking wet.
Work the paper into the channels so the grooves are well defined.
Add your seeds.
Cover the seeds with at least two more sheets
Next, take the smaller cover plate and put it over the paper then flip it over.
Repeat the process then close it up with the second cover plate.
Stand on end in shallow water and you'll have sprouts starting in 2-3 days emerging from the open top
I’ll try it again soon, using your suggestions. I’ve been using clones since my last attempt.
 
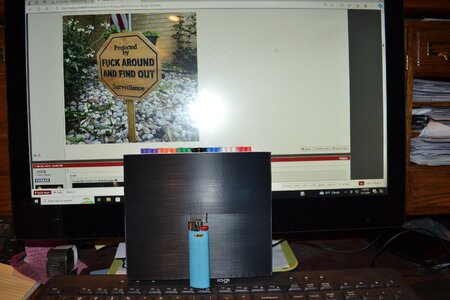
Got some printing right now for giveaways at the 420 event CannaGranny is sponsoring. We are trying to bring in some new members, and probably get pretty high in the process.

Any other cool dodads you can think of for mostly non-growers at a weed festival?
Refrigerator magnets? BB logo on the face?
 
I have magnets and stickers.
DM me your info if you want.

View attachment 54863
Nice. They look good, professional.

Shouldn’t they have the web site? I know a lot of people don’t think to try “.org” and give up if it’s not “.com”.

If I was to stick a few around the area I’d want it to direct people to the site.
 
Your mapping to coordinate multi strain drops always gets my wheels turning.

I'm bouncing around the idea of color coding the wavy insert. Instead of one big panel, several panels of 3-5 channels each and each panel is a different color. Then you just have a color code on the wall to match up strain to color that, for example, lets you know what's dropped in a blue section is bubbles. Purple could be purple blizzard and so on.

🔥


Reminds me of rows of miniature palm trees. 🌴🌴🌴🌴🌴

Not 100% are up yet but I gotta open these up and get what's ready, planted

View attachment 54861

that's a really good idea man.. i like to color code things in the grow so that would fall right into place for me. i bet i could do it simple with some acrylic paint markers!!! i'd only need the top exposed edge to have color, the rest is covered in paper towels anyway.
 
that's a really good idea man.. i like to color code things in the grow so that would fall right into place for me. i bet i could do it simple with some acrylic paint markers!!! i'd only need the top exposed edge to have color, the rest is covered in paper towels anyway.
If you’re going to go to that trouble add a tab at the top. Like in a folder drawer or old personal phone book. So you can peel it back easily. I don’t have finger nails so separating things can be a challenge at times. Just an idea.
 
Well I am gifted again [ no jokes from the peanut gallery]. 🥴
Got a care package today from @Stoneyluv ~!
DSC_0875 - Copy.JPG
DSC_0876 - Copy.JPG
22 seed VG ~! :oops:
Hell yea brother~!
:rock:

She's a big girl for sure. ;)
 
Well I am gifted again [ no jokes from the peanut gallery]. 🥴
Got a care package today from @Stoneyluv ~!
View attachment 57409
View attachment 57410
22 seed VG ~! :oops:
Hell yea brother~!
:rock:

She's a big girl for sure. ;)

ahhhh yeah!!! i got mine filled with pepper seeds right now, but i'm already jelly of the writable top and color coding. as soon as my pepper seeds pop up i'll take some pics and post some of my prepping tips to make it ez peezy to load up.

Hell yeah, large and in charge!

dude this cracks me up... i just used the exact same phrase to describe that earlier today!!!!!!
 
Me when I see people germinating seeds without using VG tech

View attachment 57509

😋
Some of us take longer to familiarize ourselves with things. 🤣

I don’t have enough seeds to fail with unless I use my own strain. So I’ll practice with them and veggies first. 🤷‍♂️

I did learn my reservoir leaks slowly so I’ll use a saucer. Already got a good rubber band.

Packing it properly I’ll need to review. Had tiny seed fall to the bottom last time. 😝

Used to watch Firefly…
 
@SSgrower @Zen_seeker @SpectrumFarms

In the very near future you guys will be getting a new version of the vertical germinator.
I can't say it's an improvement over past designs but is more so simplified and a bit easier to use greatly reducing the chance of sprouts falling out of the back side and other types of calamity like that which I've come across.

It's a basic two piece kit with only one side to manage. Here it is and how to use it....

IMG_7454[1].jpeg

IMG_7455[1].jpeg

1. Separate the corrugated insert from the cover plate.
Take a sheet of paper towel and fold it over making it two layers thick
Cut it to 4.5"x4.5" and get it wet with purified water

IMG_7463[1].jpeg

2. Lay the wet paper over the corrugated insert.
Line up one edge of the paper to one edge of the insert. The opposite side will have the paper overlap the edge like the pic above.

Working left to right or right to left, hold the edge of the paper with one hand and with the other hand, use a spatula or something similar to work the paper into the grooves.
Move your free hand over and hold down the paper in front of the spatula for each row. The red arrows show where you place your fingers to hold it down.
As you work the spatula and hold down the paper, the paper will get it's slack from the overlap and fill the channel

IMG_7461[1].jpeg

When every channel is well defined, trim away any excess paper as needed so you have a clean fit that look like this...

IMG_7465[1].jpeg

3. Take the paper lined insert laying flat and stick the bottom into the cover plate with the cover plate standing up so it's an L shape. It will be a snug and tight fit so you may have to force it in there a bit

IMG_7466[1].jpeg

4. Add your seeds sticking them in about 1/4"-1/2" from the top

IMG_7467[1].jpeg

5. Get another paper towel and fold it over so it's 4 layers thick.
Trim it to fit the corrugated plate then get it wet and cover the seeds with it

IMG_7468[1].jpeg

6. Fold the corrugated insert up and lock it into the cover plate

IMG_7470[1].jpeg

7. Place the VG in a dish with water about 1" deep then set it someplace warm and well lit. Check water level daily and keep it at 1".
In 3+ days you should start to see heads emerge from the VG. When the tap roots get to the bottom of the VG they will be about 4" long and ready to plant

IMG_7471[1].jpeg
 
Last edited:
@SSgrower @Zen_seeker @SpectrumFarms

In the very near future you guys will be getting a new version of the vertical germinator.
I can't say it's an improvement over past designs but is more so simplified and a bit easier to use greatly reducing the chance of sprouts falling out of the back side and other types of calamity like that which I've come across.

It's a basic two piece kit with only one side to manage. Here it is and how to use it....

View attachment 63833

View attachment 63834

1. Separate the corrugated insert from the cover plate.
Take a sheet of paper towel and fold it over making it two layers thick
Cut it to 4.5"x4.5" and get it wet with purified water

View attachment 63836

2. Lay the wet paper over the corrugated insert.
Line up one edge of the paper to one edge of the insert. The opposite side will have the paper overlap the edge like the pic above.

Working left to right or right to left, hold the edge of the paper with one hand and with the other, use a spatula or something similar to work the paper into the grooves.
Move your free hand over and hold down the paper in front of the spatula for each row. The red arrows show where you place your fingers to hold it down.
As you work the spatula and hold down the paper, the paper will get it's slack from the overlap and fill the channel

View attachment 63835

When every channel is well defined, trim away any excess paper as needed so you have a clean fit that look like this...

View attachment 63837

3. Take the paper lined insert laying flat and stick the bottom into the cover plate with the cover plate standing up so it's an L shape. It will be a snug and tight fit so you may have to force it in there a bit

View attachment 63838

4. Add your seeds sticking them in about 1/4"-1/2" from the top

View attachment 63839

5. Get another paper towel and fold it over so it's 4 layers thick.
Trim it to fit the corrugated plate then get it wet and cover the seeds with it

View attachment 63840

6. Fold the corrugated insert up and lock it into the cover plate

View attachment 63841

7. Place the VG in a dish with water about 1" deep and place someplace warm and well lit.
In 3+ days you should start to see heads emerge from the VG. When the tap roots get to the bottom of the VG they will be about 4" long and ready to plant

View attachment 63842
Thank you, I appreciate this! @Bandit420
 
Back
Top Bottom