3D printers and the things growers and stoners can make with them

Im trying to reset esteps... thats all and i had the hot end at 200, bed at 50.
And the extruder did nothing.

For some reason esteps was at 145, i guess it needs to be 100, but i cant get it to feed 1mm of filament, yet alone 100mm of filament. Ready to smash it so im just giving it back to my fil before i do smash it cause i have a horrible fucken temper...

Ive smashed 1000s of dollars worth of cell phones, a 300 dollar printer wouldnt be anything 🤣🤣
Just chill and go roll one and then get back on it.
 
I had another clogging issue in the hotend today.
A PETG print finished while I was sleeping and cooled down. The next print I wanted to do was with regular PLA and even though 200 on the preheat let me pull the PETG to swap it our for the PLA, it still left a clog. Next time I'll preheat to 240 before I pull it. Usually I pull the filament back right after a print and it helps reduce clogs to near 100%. Letting it cool in there was the beginning of the end.
I am getting better and faster at rebuilding hotends though, so there's that 😋

Another problem with my heat sink is the sorry plastic coupler for the bowden tube. I replaced that with a metal one so no more cracks.

I'm also gonna upgrade my printer to direct drive. The extruder works fine but every so often the coupler fails and spits the bowden tube out. So the couplers on both ends of my bowden tube have been problematic.
Direct drive may solve all that. Instead of a long tube it will only be a few inches at most and the DD mounts to the top of the hotend. I also ordered a new spool mount that will mount to the top of the gantry so my filament will start coming from above instead of from the side.

Also thinking about a bimetal heat break but not so sure I need it yet. Could be more trouble than it's worth.
I just rebuilt my hotend and have it back up and running now so if all goes well I'll shelve the heat break for now. I think for now swapping the plastic couplers for metal, clearing the clog, using a new bowden tube, and going to direct drive will help my most nagging and recurring issues.
 
I shut it off. Ill try again next week.


Maybe. Lol

did you get it fixed man? i never heard of an estep issue before... sounds software.. i'd download the firmware from creality, put it on a clean sd, put it in the printer and turn it on. the firmware will automatically load right away on its own. wait for it to restart pull out the sd and level your bed and z axis like you would do if it was brand new.

and keep that shorter tube around after you replace it, it's nice to have an old one you don't care about to clean out the hot end now and again.

I had another clogging issue in the hotend today.
A PETG print finished while I was sleeping and cooled down. The next print I wanted to do was with regular PLA and even though 200 on the preheat let me pull the PETG to swap it our for the PLA, it still left a clog. Next time I'll preheat to 240 before I pull it. Usually I pull the filament back right after a print and it helps reduce clogs to near 100%. Letting it cool in there was the beginning of the end.
I am getting better and faster at rebuilding hotends though, so there's that 😋

Another problem with my heat sink is the sorry plastic coupler for the bowden tube. I replaced that with a metal one so no more cracks.

I'm also gonna upgrade my printer to direct drive. The extruder works fine but every so often the coupler fails and spits the bowden tube out. So the couplers on both ends of my bowden tube have been problematic.
Direct drive may solve all that. Instead of a long tube it will only be a few inches at most and the DD mounts to the top of the hotend. I also ordered a new spool mount that will mount to the top of the gantry so my filament will start coming from above instead of from the side.

Also thinking about a bimetal heat break but not so sure I need it yet. Could be more trouble than it's worth.
I just rebuilt my hotend and have it back up and running now so if all goes well I'll shelve the heat break for now. I think for now swapping the plastic couplers for metal, clearing the clog, using a new bowden tube, and going to direct drive will help my most nagging and recurring issues.

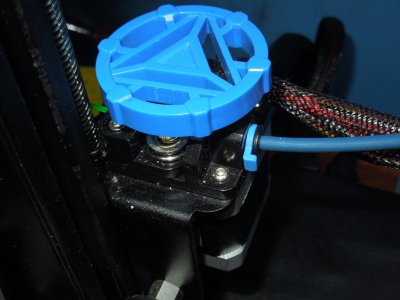
i've always assumed thats how you were supposed to do it... when i tried to switch filament cold the first time it wouldn't move so i just figured it had to be hot. and yeah, high temp too... figure the different types of filament melt together and make an alloy of some type so i always put it at high temp and manually turn the extruder to pump out all the mixed colors and types before moving on to the print. but i think i'm the only one here with a knob on their extruder so it's ez for me to say i manually push the filament through...

DSCN0937.JPG

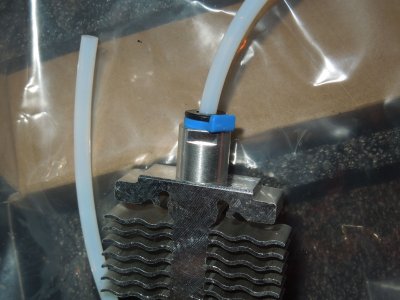
and i've heard that the metal fittings are the best, i don't think i can use them though. i bought metal ones with an official bowden tube (my printer came with a softer generic white ptfe tube ) and it came with the fittings but both my hotend and extruder have the fitting molded in as part of it so there are no threads to put the better fittings..

DSCN0941.JPG

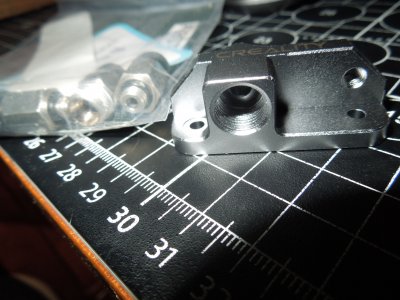
back when i thought the extruder skipping was an extruder problem i bought a replacement and that has threads so i can put the metal fitting on one end but my hotend is still molded all as one.

DSCN0939.JPG

do we have different hotends?
i know our extruders are different but i wasn't sure on the hot side...

my replacement didn't really fit perfect, the fins were wider on the replacement and they touched the plastic fan housing so i hit the fins a little with my bench grinder and made it the same size as the oem.

i have yet to find any replacement parts that are identical to my neo. seems everything i find is for an ender 3 v2. and not the neo version. it's ok though i've come to the realization that everything i buy must be reengineered to hold up to what it it supposed to do anyway so the printer is no exclusion. :LOL:
 
did you get it fixed man? i never heard of an estep issue before... sounds software.. i'd download the firmware from creality, put it on a clean sd, put it in the printer and turn it on. the firmware will automatically load right away on its own. wait for it to restart pull out the sd and level your bed and z axis like you would do if it was brand new.

and keep that shorter tube around after you replace it, it's nice to have an old one you don't care about to clean out the hot end now and again.


i've always assumed thats how you were supposed to do it... when i tried to switch filament cold the first time it wouldn't move so i just figured it had to be hot. and yeah, high temp too... figure the different types of filament melt together and make an alloy of some type so i always put it at high temp and manually turn the extruder to pump out all the mixed colors and types before moving on to the print. but i think i'm the only one here with a knob on their extruder so it's ez for me to say i manually push the filament through...

View attachment 17709

and i've heard that the metal fittings are the best, i don't think i can use them though. i bought metal ones with an official bowden tube (my printer came with a softer generic white ptfe tube ) and it came with the fittings but both my hotend and extruder have the fitting molded in as part of it so there are no threads to put the better fittings..

View attachment 17711

back when i thought the extruder skipping was an extruder problem i bought a replacement and that has threads so i can put the metal fitting on one end but my hotend is still molded all as one.

View attachment 17710

do we have different hotends?
i know our extruders are different but i wasn't sure on the hot side...

my replacement didn't really fit perfect, the fins were wider on the replacement and they touched the plastic fan housing so i hit the fins a little with my bench grinder and made it the same size as the oem.

i have yet to find any replacement parts that are identical to my neo. seems everything i find is for an ender 3 v2. and not the neo version. it's ok though i've come to the realization that everything i buy must be reengineered to hold up to what it it supposed to do anyway so the printer is no exclusion. :LOL:

I'll never understand why Creality didn't give this extruder a manual option like yours.

Yeah our hotends are slightly different. That top part of yours that half metal and half plastic is where mine was all plastic. The little push part would break and jam up the tube so I'd pretty much have to completely break it and crush the tube in order to get it out and clear a clog.
The plastic part looked like it was molded into the heat sink so on another sink, I grabbed some pliers and gave it the business. Turns out it was just screwed in so I got metal couplers to replace it and here's what I ordered


I'm probably going to send the direct drive extruder back.
It's pretty much giving me the same problems Goodshit is having with a bad extruder setting and yeah it's a PITA to fix. It's a firmware deal and to fix it you need to plug the printer into a PC and using a program called Pronterface.

Here's the video on how to calibrate and eventually I may do this but right now I'm so damn tired I can't get into it.


But I do really like the new spool mount on the gantry. I can't do overhead right now but it's on the side and out of my way. And I've cleared my clog and reset everything to get back in good running order today

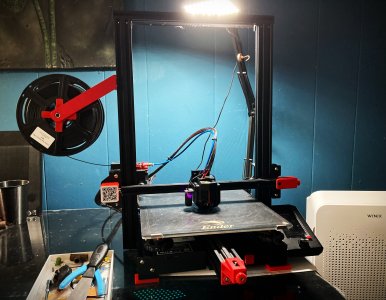
IMG_0442.JPG

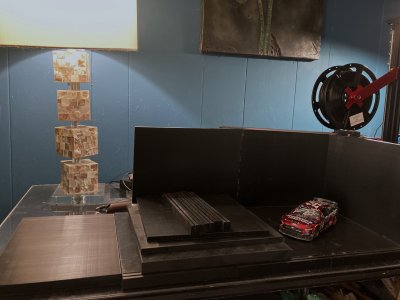
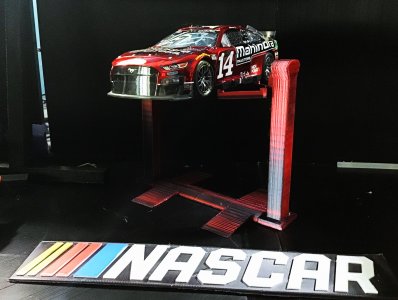
Ran a test print and all is well so it's back to the garage project. Making rafters now and thinking the roof of this thing will be glass like the front wall but the diecast garage is back under construction! It's over 30" long, over 12" deep and about 12" tall. Black is just the base then after it's done I'll print things like flooring, wall coverings, car lifts, and add LED lighting

IMG_0443.JPG
 
Seems like a lot of moving parts that can go wrong. I've been there. Stay at it. You'll get it working. Just go at it in chunks instead of trying to solve it all at once.
Yeah i havent touched it, i took apart my hot end to clean it out and in the process of cleaning up i mustve thrown the actual head away. All i have is the little heat sink looking thing. I dont have the piece the actual heat/temp probes go in, so i have to order and entire new hot end. Yay 😤🤬
 
Yeah i havent touched it, i took apart my hot end to clean it out and in the process of cleaning up i mustve thrown the actual head away. All i have is the little heat sink looking thing. I dont have the piece the actual heat/temp probes go in, so i have to order and entire new hot end. Yay 😤🤬
Are you getting the complete kit with fan and housing or just the guts like this kit


When I ordered my first replacement I ordered the whole thing for like $47 and I only needed the $25 guts. But at least now I have some spare fans 🥴
 
"Spare Parts" can be the bane of my existence or my saviour. Can't tell you how many projects that I'm about to give up on get completed from my jury rigging with "spare parts". I call it my last resort drawer.

My GF likes things tidy so she'll sometimes get into the drawer and try and get me to rotate some things out. For some reason she doesn't understand that spare part from years ago might come in handy when I'm 90! 🤣
 
My new favorite thing to go with 3D printing....Vinyl automotive wrap.😋
Final part is printing now so by 5pm today, this project is done!!!🥳

IMG_5391.JPG

IMG_5392.JPG

View attachment IMG_5394.MOV


5 months of design and printing and too many bad prints to count.
3 1/2 spools of black PLA+ was used- $60
$78 of custom cut mirror glass for back walls
$12 of hobby sheet glass for front wall and top (may replace with custom cut tempered glass later)
1 hot glue gun and lots of gorilla glue sticks- $15
roll of led tape light - $12
12"x5' roll of metal flake gloss black vinyl wrap for the flooring- $15
$20 for a box of paint markers

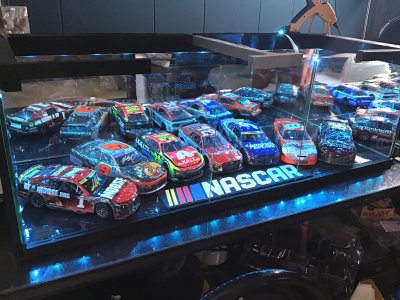
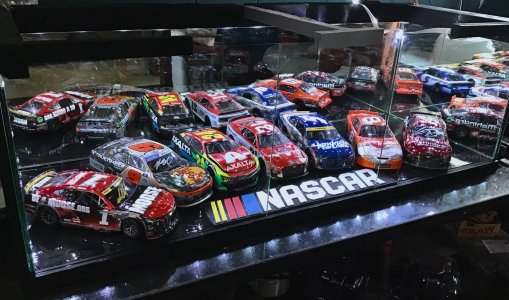
A one of a kind 32"x12"x12" display case for a bunch of wrecked race cars with color changing lights that sync to music: Priceless😎
 
My new favorite thing to go with 3D printing....Vinyl automotive wrap.😋
Final part is printing now so by 5pm today, this project is done!!!🥳

View attachment 19585

View attachment 19586

View attachment 19587


5 months of design and printing and too many bad prints to count.
3 1/2 spools of black PLA+ was used- $60
$78 of custom cut mirror glass for back walls
$12 of hobby sheet glass for front wall and top (may replace with custom cut tempered glass later)
1 hot glue gun and lots of gorilla glue sticks- $15
roll of led tape light - $12
12"x5' roll of metal flake gloss black vinyl wrap for the flooring- $15
$20 for a box of paint markers

A one of a kind 32"x12"x12" display case for a bunch of wrecked race cars with color changing lights that sync to music: Priceless😎
Absolutely killer bro. 👊🏼
 
My new favorite thing to go with 3D printing....Vinyl automotive wrap.😋
Final part is printing now so by 5pm today, this project is done!!!🥳

View attachment 19585

View attachment 19586

View attachment 19587


5 months of design and printing and too many bad prints to count.
3 1/2 spools of black PLA+ was used- $60
$78 of custom cut mirror glass for back walls
$12 of hobby sheet glass for front wall and top (may replace with custom cut tempered glass later)
1 hot glue gun and lots of gorilla glue sticks- $15
roll of led tape light - $12
12"x5' roll of metal flake gloss black vinyl wrap for the flooring- $15
$20 for a box of paint markers

A one of a kind 32"x12"x12" display case for a bunch of wrecked race cars with color changing lights that sync to music: Priceless😎
Wait, whaaa? You are 3D printing vinyl wrap?
 
Wait, whaaa? You are 3D printing vinyl wrap?
No but anything that's printed in basic shapes like round, square, rectangle, etc can be printed in low cost black filament then wrapped with vinyl.

So like for something like the flooring of this case or the planter boxes I've designed...Rather than use spendy colors and silk filament which has no UV protection, print it in black and wrap it. You'll get way better colors and designs while also getting UV protection for outdoor use. ;)
My next step with the case is use a dark wood grain vinyl wrap on the exterior so it will look like it's made of wood and not 3D printed plastic.
 
damn that's very cool man!!! the two post lift is just as badass!!!

wow mirrors are expensive!! really puts it over the top though!!!

i hate to really ask... what happens when the new cars come in? second level?
 
This is why my son keeps asking to go half’ers on a 3D printer.

IMG_4655.jpegIMG_4656.jpegIMG_4657.jpeg

This is only part of his collection. It keeps changing as he gets older.

I can see we’d be printing 24/7 and I’d need a sign-in sheet for when it was my turn. 🤣

Currently he’s building the new MDF storage and desk units.
 
damn that's very cool man!!! the two post lift is just as badass!!!

wow mirrors are expensive!! really puts it over the top though!!!

i hate to really ask... what happens when the new cars come in? second level?

IDK yet man. I'm looking at lift ideas to stack a few or maybe acrylic shelves. I made a smaller NASCAR plate that would let me get 1 or 2 more on the floor but yeah I'll need space for Zane Smith's COTA fire truck, SVG's Chicago win, and Josh Williams NXS "Park It" car. Larson's Hendrick 1100 duo will get it's own special case so I have a year to make that one.
Next up is the helmet case which will sit on top.

Yeah the mirrors were a spendy but worth it choice in the end decision. I was really impressed with the online glass shop. They can pretty much cut and deliver any kind of glass job you need. These mirrors are super thick and high quality which is why I'm thinking of ordering a tempered glass for the top to replace the sheet glass from them.
It was $78 for three mirrors really...a 12"x32" and two 8"x12" for the side walls.
When I was searching for the mirrors the 12x32 could be had in a precut from wayfair or ikea 12x30 but it was like $300! IDK why but mirrors are expensive! I also thought about mylar but if it creased or anything it wouldn't look good so I splurged on the mirrors.
I was gonna go with white walls with little mini pics of the cars and the actual wrecks they were in but some of these cars have damage on all four sides and that's what makes them cool. So mirrors give the ability to see all four sides. I'll be doing the same with the mini helmet case too.
 
5 months of design and printing and too many bad prints to count.
3 1/2 spools of black PLA+ was used- $60
$78 of custom cut mirror glass for back walls
$12 of hobby sheet glass for front wall and top (may replace with custom cut tempered glass later)
1 hot glue gun and lots of gorilla glue sticks- $15
roll of led tape light - $12
12"x5' roll of metal flake gloss black vinyl wrap for the flooring- $15
$20 for a box of paint markers

A one of a kind 32"x12"x12" display case for a bunch of wrecked race cars with color changing lights that sync to music: Priceless😎

Awesome display case! Wish I had something like that for my 1/24 Mini-Z cars. Have you seen the garages PN makes?

 
I wish I was there with ya @GoodShit97 It can be frustrating starting out for sure. You need to have a few trouble free prints under your belt before these things start to be somewhat predictable. I'm just gonna plug Prusa one time, other than rebuilding the hot end my printers have always just worked. Feed them good plastic and keep the drafts down and they just run and run. I really only screw up the hotend when I feed them cheap plastic and like bandit had the stuff cools in the pipe and won't all come out. Software - just take the defaults and shit just works.
 
alright, i have a request as I don't have a 3D printer -- yet. maybe in the future. not right now though, at least not until @GoodShit97 changes my mind lol

i haven't been able to find floraflex caps that'll fit on 3" rockwool blocks. I have a bunch for the 4" blocks, and I really like the dual purpose they provide (better distribution of solution across the top of the block, cut down on algae growth, give the feed line a spot to mount to). Would i be able to bother someone to redesign these by taking off 1" around the perimeter but keeping the rest of the dimensions the same? I imagine some CAD designing would be in order. I'm willing to foot the bill to make it happen, though!
 
maybe in the future. not right now though, at least not until @GoodShit97 changes my mind lol
Mine sits in my kitchen on a desk broken. All the parts are sitting in a drawer to fix it.... i just lost all interest in it as im not tech savvy by any means and it pisses me off more than anything else i own. Prolly gonna sell it soon lol.
 
alright, i have a request as I don't have a 3D printer -- yet. maybe in the future. not right now though, at least not until @GoodShit97 changes my mind lol

i haven't been able to find floraflex caps that'll fit on 3" rockwool blocks. I have a bunch for the 4" blocks, and I really like the dual purpose they provide (better distribution of solution across the top of the block, cut down on algae growth, give the feed line a spot to mount to). Would i be able to bother someone to redesign these by taking off 1" around the perimeter but keeping the rest of the dimensions the same? I imagine some CAD designing would be in order. I'm willing to foot the bill to make it happen, though!

Something like one of these?


Back
Top Bottom