3D printers and the things growers and stoners can make with them

Mine sits in my kitchen on a desk broken. All the parts are sitting in a drawer to fix it.... i just lost all interest in it as im not tech savvy by any means and it pisses me off more than anything else i own. Prolly gonna sell it soon lol.
and that's why i don't have on yet lol i'm in tech, but what i know about those printers is they can be more problematic than not and unless you have the time to invest in tinkering, they're just gonna piss you off.
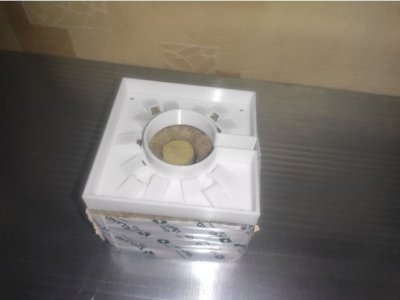
Something like one of these?


yep! but, the floraflex offerings have spikes that set into the rockwool. all the designs i've seen on the FOSS design sites lack that component, so there's nothing to hold the covers in place. I just don't see them being functional without the spikes.
 
I just cant afford a prusa at $800+
Everyone i know with a prusa says theyre pretty much set and walk away.
i hear ya. in the same boat, i can think of a lot more effective ways to spend $800 than something that will be of minimal utility.

now, if they can print metal, i have use for it. plastic bits not so much.
 
and that's why i don't have on yet lol i'm in tech, but what i know about those printers is they can be more problematic than not and unless you have the time to invest in tinkering, they're just gonna piss you off.

yep! but, the floraflex offerings have spikes that set into the rockwool. all the designs i've seen on the FOSS design sites lack that component, so there's nothing to hold the covers in place. I just don't see them being functional without the spikes.

Spikes for those and drip rings etc are always a separate print. Same for these so the spikes can be glued on or held on with small stainless steel screws.
Predrilled holes can also be made in the design to make attaching with screws ez and clean.
And then of course things can always be tooled so sleeves to hold spikes can be included. Pretty much anything is possible

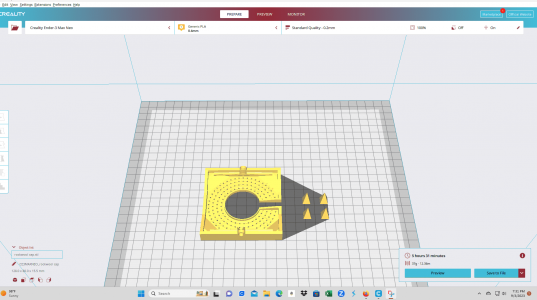
Right now, this cap sized at 80mmx80mm at 100% density for durability is less than a 6 hour print for each block cap kit.

rw caps.png
 
Spikes for those and drip rings etc are always a separate print. Same for these so the spikes can be glued on or held on with small stainless steel screws.
Predrilled holes can also be made in the design to make attaching with screws ez and clean.
And then of course things can always be tooled so sleeves to hold spikes can be included. Pretty much anything is possible

Right now, this cap sized at 80mmx80mm at 100% density for durability is less than a 6 hour print for each block cap kit.

View attachment 19936
i had no f'in idea! i just thought these designs were lacking a significant detail
Can you lengthen the side skirts to stabilize the plate onto the cube without the spikes?
THIS would be a massive improvement over floraflex's design. even with the spikes, the caps still lift up. having an extended skirt would add so much stability and cut out the remaining issue of algae growth. anywhere light can get in, algae will grow on those blocks. it's not a problem initially but will become a problem if allowed to take off.
 
Can you lengthen the side skirts to stabilize the plate onto the cube without the spikes?
It might get weird and make a bad print without support but it's possible. And then adding the support could make it to where the support scaffolding holds too well and leaves burrs.

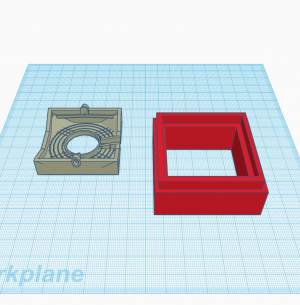
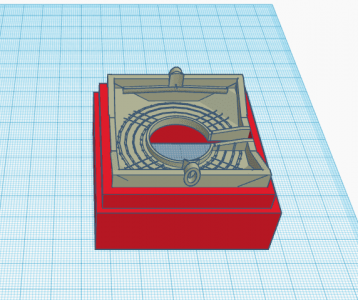
It's also possible to make an adapter sleeve that fits over the cube and the drip tray locks down into the adapter. That would be a lot easier and give a clean print while also eliminating the spikes
 
It's also possible to make an adapter sleeve that fits over the cube and the drip tray locks down into the adapter. That would be a lot easier and give a clean print while also eliminating the spikes
that's what i was thinking. the adapter could eliminate the spikes entirely. dealing with the tolerances of the blocks would be problematic though -- we're not talking about machine-level accuracy with these things. so the adapter would need some kind of drip edge to ensure leakage doesn't run down the sides of the blocks and keeps the solution going right into the target.
 
iirc floraflex manufactures their units with flow form injection. 3D printing likely isn't the right option for this particular piece. definitely have my gears turning now though.

if anyone is still interested, i'll pay for time + materials for the R&D and production of some prototypes.
 
adapter drawings

View attachment 19937

View attachment 19938

As with anything you might grow with or eat off, I'd print these in food grade plastic or PETG
what size are the holes for the solution to go through? my concern is the holes not being large enough to combat the stickiness of water. h2o is a fickle bitch.

also, are the ports sized for 1/4" irrigation line? can grab my micrometer and provide measurements if needed. so long the ID is correct -- snug, but reasonable.
gotta drill?;)

I'm not sure how big they are. They can be made larger by design or drilled out.
I think the line holes are for 1/4" tubing but again, not sure.
This design is supposed to be for 4x4 blocks so once you start to resize, those holes also resize and since I don't know their original diameter, I can't say what the resized diameter will be until later. Whoever designed this left out those details so there's some reverse engineering to some of these designs

I'm making a 50mmx50mm test print of this right now. If it looks good and clean I'll resize to 3" and go from there.
Sometimes with stuff like this and those feeder line holes, I have to print it first and see what the actual size is after printing. From there I can go back to the drawings and resize those holes to exact specs. I had to do that for my drip rings on both the feeder line hole, it's depth, and the dripper holes made larger.
yeah i noticed that on a lot of those designs. it doesn't help the 3" delta blocks are not too common. shit, it took me the better part of two months to find them and IIRC they came from the UK. TBH, they're far superior aside from the lack of any add-on support.
 
LOL! Why go to the trouble of doing all that. Just make an adapter with spikes.
ime the floraflex with spikes lift up because the irrigation tube has memory from being coiled. the spikes aren't barbed, and even if they were, the rockwool essentially collapses when the spikes are pushed in. they don't regain form around the spikes. so, they're nothing more than to hold the adapter steady in a horizontal state but do nothing for vertical pulling forces.
 
ime the floraflex with spikes lift up because the irrigation tube has memory from being coiled. the spikes aren't barbed, and even if they were, the rockwool essentially collapses when the spikes are pushed in. they don't regain form around the spikes. so, they're nothing more than to hold the adapter steady in a horizontal state but do nothing for vertical pulling forces.

A little trcik with that polypro tubing is take it outside on a hot and sunny day and stretch it out. Use a rock or brick to hold down each end and get it as taught as possible. That sun & heat will take that coil out and turn it into a limp noodle in a few hours and make it ez to work with.
 
A little trcik with that polypro tubing is take it outside on a hot and sunny day and stretch it out. Use a rock or brick to hold down each end and get it as taught as possible. That sun & heat will take that coil out and turn it into a limp noodle in a few hours and make it ez to work with.
i'll be happy to do that next year lol the clouds have arrived in the PNW.

i'll probably roast my fingers with the heat gun and the pieces I have on the manifold now. i've never been able to get the memory fully removed even with the sun on the larger ABS tubing for drip systems. at least when the shit is hot, you can get it in a form that's manageable.
 
yeah i noticed that on a lot of those designs. it doesn't help the 3" delta blocks are not too common. shit, it took me the better part of two months to find them and IIRC they came from the UK. TBH, they're far superior aside from the lack of any add-on support.

Well I have the test print done and it needs a lot of work. The adapter sleeve is on point but that tray download is less than ideal.
I was looking at your diary, checking out your set up, and finally looking at Floraflex stuff and this is totally possible to build but I'd probably start it from scratch.

TBH, Floraflex looks a little over engineered IMO so I'd dumb it down a lot rather than duplicate it.
I can make the diffuser tray with a tab that will let you plug in the spaghetti line and keep it connected. The water would flow into the tray and by having maybe only 5-10 holes would be all that's needed given that it's rockwool and the way water saturates it. Those holes can be made a little big to make sure they don't clog too.
And yeah rather than those spikes on the bottom I'd do the adapter sleeve that goes over the RW block and then the diffuser tray locks down into it.

If you want I can tinker with this and come up with something cool and functional. All I'd really need is info on those cubes..Are they the Grodan 3x3x2.5?
How tall would the adapter sleeve need to be so I'd need the exact height of how tall the block is sitting on the slab.
And finally would you want it closed or have a slot in the side so you can put it on the plant later rather than popping the seed and having to put the cap over it to grow thru the center hole?
Like Floraflex doesn't have the side slot but you can see in the 3D downloads I posted they all have side slots.

Timeline for something like this would probably be a couple weeks and cost would be a roll of PETG filament in your choice of color since I only have clear and crystal here. I'd suggest blue since algae doesn't grow on blue surfaces but any color will work. The roll would be anywhere from $15-$35 depending on quality and then shipping cost from Texas to you.
 
what size are the holes for the solution to go through? my concern is the holes not being large enough to combat the stickiness of water. h2o is a fickle bitch.

also, are the ports sized for 1/4" irrigation line? can grab my micrometer and provide measurements if needed. so long the ID is correct -- snug, but reasonable.
Shark bite connection would be awesome.
 
Well I have the test print done and it needs a lot of work. The adapter sleeve is on point but that tray download is less than ideal.
I was looking at your diary, checking out your set up, and finally looking at Floraflex stuff and this is totally possible to build but I'd probably start it from scratch.

TBH, Floraflex looks a little over engineered IMO so I'd dumb it down a lot rather than duplicate it.
I can make the diffuser tray with a tab that will let you plug in the spaghetti line and keep it connected. The water would flow into the tray and by having maybe only 5-10 holes would be all that's needed given that it's rockwool and the way water saturates it. Those holes can be made a little big to make sure they don't clog too.
And yeah rather than those spikes on the bottom I'd do the adapter sleeve that goes over the RW block and then the diffuser tray locks down into it.

If you want I can tinker with this and come up with something cool and functional. All I'd really need is info on those cubes..Are they the Grodan 3x3x2.5?
How tall would the adapter sleeve need to be so I'd need the exact height of how tall the block is sitting on the slab.
And finally would you want it closed or have a slot in the side so you can put it on the plant later rather than popping the seed and having to put the cap over it to grow thru the center hole?
Like Floraflex doesn't have the side slot but you can see in the 3D downloads I posted they all have side slots.

Timeline for something like this would probably be a couple weeks and cost would be a roll of PETG filament in your choice of color since I only have clear and crystal here. I'd suggest blue since algae doesn't grow on blue surfaces but any color will work. The roll would be anywhere from $15-$35 depending on quality and then shipping cost from Texas to you.
Awesome! I'll get you some dimensions here in a bit. got my first decent night's sleep in what seems like a month, and am just not getting into some caffeine. made the mistake of buying the watermelon kiwi rockstar, and this shit is way too sweet.

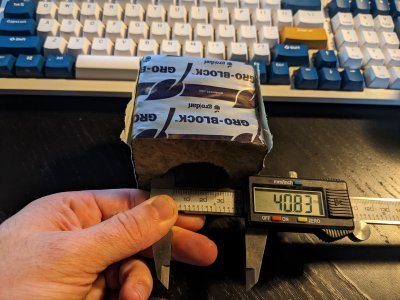
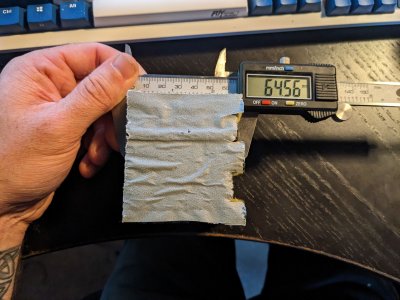
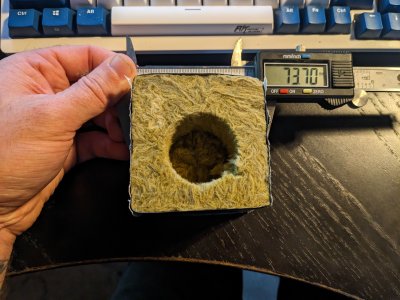
how accurate do you need the dimensions, and does it matter whether they're in inches or mm? i'll be busting out the handy ol' digital caliper for the job, so it can read either.

A slot would be ideal. it doesn't need to be large, but needs to be larger enough to slide a clone stem through. i do like the floraflex design of having the rail to clip the line holder onto, but having that integrated into the cap itself would work just as well. i think they designed it the way they did for two reasons. one is flexibility for the end user and two is for cheaper adapter production. could be wrong, though. they sure are proud of those things either way. iirc when i bought 4" pieces, they were something to the tune of $35 for six of em or something like that. it's been a while, so can't recall for sure, but i remember trying to get my nephew to 3d print some before i finally bit the bullet and ordered them.
 
Just an observation but the part where the feed line connects to the distro plate. Can that be removable for cleaning? Just thinking it could be a point where diminishing delivery due to progressive blockage might be an issue.
 
Awesome! I'll get you some dimensions here in a bit. got my first decent night's sleep in what seems like a month, and am just not getting into some caffeine. made the mistake of buying the watermelon kiwi rockstar, and this shit is way too sweet.

how accurate do you need the dimensions, and does it matter whether they're in inches or mm? i'll be busting out the handy ol' digital caliper for the job, so it can read either.

A slot would be ideal. it doesn't need to be large, but needs to be larger enough to slide a clone stem through. i do like the floraflex design of having the rail to clip the line holder onto, but having that integrated into the cap itself would work just as well. i think they designed it the way they did for two reasons. one is flexibility for the end user and two is for cheaper adapter production. could be wrong, though. they sure are proud of those things either way. iirc when i bought 4" pieces, they were something to the tune of $35 for six of em or something like that. it's been a while, so can't recall for sure, but i remember trying to get my nephew to 3d print some before i finally bit the bullet and ordered them.

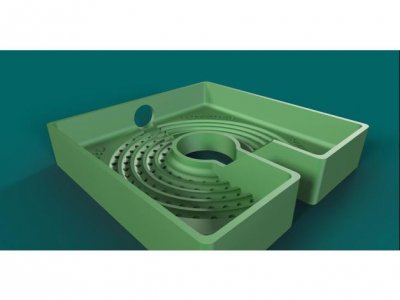
I'm gonna try to work with this model to start since it's almost a knock off of Floraflex. This print also comes with a FLX style tubing clip

flcap1.jpg

And then there's this one I'll be working with too. That hole in the side can be changed and filled in then a separate clip or built in line holder can be added

rwcap2.jpg

I looked over all I have in PETG and forgot I have black and hot pink so if you want one of those colors I already have them. I've been wanting some blue for other projects so I'll have blue soon too but those are the only PETGs I have on hand. So I might be able to get these to you for just the cost of shipping if you're fine with any of those colors.


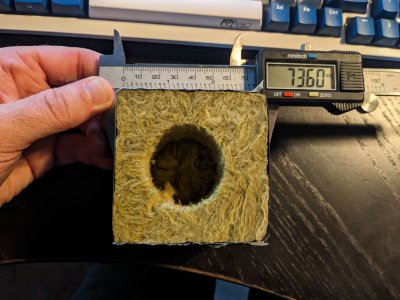
Yeah give me the measurements of those cubes with the digital caliper in millimeters. Main thing I need to know is if it's a true 3x3 so I know how much room to give the fit. I'll try to make it a snug fit but not so tight it squishes the rockwool.
Most important dimension is the height of the cube sitting on the slab. I think it's 2.5 inches but not 100%. That's the one where too high and there will be a gap between the plate and top of rockwool. Too short wouldn't be too bad if it's less than 10mm or so but I'd like to see the adapter sleeve pretty much replace the soft plastic sleeve around the block so it doesn't even look like it's a rockwool cube but a little plastic box

I'll do the design when I have some free time this week and then maybe be able to print something over the weekend
 
I'm gonna try to work with this model to start since it's almost a knock off of Floraflex. This print also comes with a FLX style tubing clip

View attachment 20022

And then there's this one I'll be working with too. That hole in the side can be changed and filled in then a separate clip or built in line holder can be added

View attachment 20023

I looked over all I have in PETG and forgot I have black and hot pink so if you want one of those colors I already have them. I've been wanting some blue for other projects so I'll have blue soon too but those are the only PETGs I have on hand. So I might be able to get these to you for just the cost of shipping if you're fine with any of those colors.


Yeah give me the measurements of those cubes with the digital caliper in millimeters. Main thing I need to know is if it's a true 3x3 so I know how much room to give the fit. I'll try to make it a snug fit but not so tight it squishes the rockwool.
Most important dimension is the height of the cube sitting on the slab. I think it's 2.5 inches but not 100%. That's the one where too high and there will be a gap between the plate and top of rockwool. Too short wouldn't be too bad if it's less than 10mm or so but I'd like to see the adapter sleeve pretty much replace the soft plastic sleeve around the block so it doesn't even look like it's a rockwool cube but a little plastic box

I'll do the design when I have some free time this week and then maybe be able to print something over the weekend
sweet, sounds good man!

i'll snag some pics with the caliper here in a sec. had to knock out some last minute back-to-school things for the kids.
 
I've played with my own design for this and what I have learned is that it is important to set up individual flow channels so to speak. If you have a plane surface with holes, the water will all go to one corner as soon as the surface is not perfectly level.

I think that is why flora has that little halo in the middle. It sets up individual streams which follow the channels in the matrix. The height of the ridges determines of off angle the tray can be and still work.
 
alright, i have a request as I don't have a 3D printer -- yet. maybe in the future. not right now though, at least not until @GoodShit97 changes my mind lol

i haven't been able to find floraflex caps that'll fit on 3" rockwool blocks. I have a bunch for the 4" blocks, and I really like the dual purpose they provide (better distribution of solution across the top of the block, cut down on algae growth, give the feed line a spot to mount to). Would i be able to bother someone to redesign these by taking off 1" around the perimeter but keeping the rest of the dimensions the same? I imagine some CAD designing would be in order. I'm willing to foot the bill to make it happen, though!
Man I'm starting to not give a fuck about algae growth on top.

every solution is 2-3mls hypo acid and 4-6ml h2o2@34%

maybe i need to increase the hypo but then i think ill start getting into dangerous territory destrlying leafs from inside out with Cl

Could use aluminum foil I guess.
 
Last edited:
i hear ya. in the same boat, i can think of a lot more effective ways to spend $800 than something that will be of minimal utility.

now, if they can print metal, i have use for it. plastic bits not so much.
I keep looking around at little plastic things that could be fixed trying to justify saving up for one.

Like the bar clamp fans. The soft plastic switch that makes it oscillate. When the tent gets sucked in by negative pressure it wrecks the gear/switch. Print a new one.

Worm drive mixing gear, same soft plastic that breaks over time by rounding corners so it no longer turns. Print new gears.

Handle catch on microwave breaks, as designed, about once every few years. L or Z shaped latch snaps at angles over time. Print a stronger one.

Glue, baking soda, thin cloth, fine sand are all things I can use to fix things but a 3D printer would be a step up if not a more permanent solution. IMO
 
I'm gonna try to work with this model to start since it's almost a knock off of Floraflex. This print also comes with a FLX style tubing clip

View attachment 20022

And then there's this one I'll be working with too. That hole in the side can be changed and filled in then a separate clip or built in line holder can be added

View attachment 20023

I looked over all I have in PETG and forgot I have black and hot pink so if you want one of those colors I already have them. I've been wanting some blue for other projects so I'll have blue soon too but those are the only PETGs I have on hand. So I might be able to get these to you for just the cost of shipping if you're fine with any of those colors.


Yeah give me the measurements of those cubes with the digital caliper in millimeters. Main thing I need to know is if it's a true 3x3 so I know how much room to give the fit. I'll try to make it a snug fit but not so tight it squishes the rockwool.
Most important dimension is the height of the cube sitting on the slab. I think it's 2.5 inches but not 100%. That's the one where too high and there will be a gap between the plate and top of rockwool. Too short wouldn't be too bad if it's less than 10mm or so but I'd like to see the adapter sleeve pretty much replace the soft plastic sleeve around the block so it doesn't even look like it's a rockwool cube but a little plastic box

I'll do the design when I have some free time this week and then maybe be able to print something over the weekend
Now do one for a solo cup

Lol
 
Man I'm starting to not give a fuck about algae growth on top.

every solution is 2-3mls hypo acid and 4-6ml h2o2, maybe i need to increase the hypo but then i think ill start getting into dangerous territory destrlying leafs from inside out with Cl

Could use aluminum foil I guess.
I get it on the clones or seedlings lately. Never used to. Not a problem so far. Just sits on the top soil when in red cups under low light. Seems to disappear when up potted and lights turned up.

Can it be a problem?
 
Back
Top Bottom