🌞TSD's 2023 Scrog Under The Sun🌞

Yea just basic vinyl replacements, nothing past that, just an old flood house....governments about to force me up or out with 1 more flood so we will see. I say just leave me alone and let me repair my shit myself, if it passes your inspection then piss off...they say otherwise. FEMA, all that crap involved in it...I don't get a cent of help though so I don't understand their beef (their beef is with others really). This past flood in 2019 I paid for 100% of the repairs 🤷‍♂️

TSD hope your river is friendly
Ok so after stating it is pretty easy, it was for me. My home was completed in the early 1960's. I have wood stud walls with drywall on the inside and stucco on the outside. I do not believe stucco is common on the east coast. It is basically a cement mixture that is shoot on to the side of the house and used lath for additional support.
First thing you have to know is the size of the replacement windows. With replacement windows you leave the existing jamb in place and remove the sash. The jamb width and height are your rough opening for your new window ( you loose some width and height. So lets say you have a RO (rough opening) of 24" x 36". You want about 1/4" to 3/8" to level and plumb the new window. So you OD (outside dimension) for ordering is 23 3/4" x 35 3/4". Next you need to know what kind of window you have. Casement, awning, sliding. (you tube is your friend). You will also need to know the hand.

So you have the window now and the fun begins. you take the sash out of the window and in my case I had existing aluminum windows with a small drip protruding out on the exterior side of the windows. I had to sawzall the drip off. 5 minutes maybe and 1 blade per window. Next you need to clean around the exterior side of the opening. The replacement window comes with a fairly large exterior fin. This is for bonding to the exterior finish of the home. This needs to be a water tight seal, I would recommend using a polyurethane specifically designed for window sealing. You run a continuous bead around the window put the window in place and screw it off (you tube this as well) Window is now installed but there is more. I would recommend spray foam around the interior of the whole window because as mentioned the new window is smaller than the old existing window. Spray foam and leave for a day to dry. Knock off any high spots you may have and trim out the inside of the window. You have a few options on this. You can use the standard vinyl tape the window comes with our you can use wood. I chose to use wood and trim out the interior side of the window with a process called picture framing the window. It provides a very clean interior look. But in todays days it is costly even if you choose to go with MDF. Never buy moldings at the big brand stores their markup is about 300 to 400 percent. Look for a molding company in your area.
 
I just cant afford a 700 dollar door, thats the only reason its not fixed lol.
You may not need a new door. Can you post up a picture of the 3 sides of the door so I can see the reveals around the door. I have been working with those darn things for too long. I usually never tell anyone what I actually do because just about everyone has one of those that needs work and you become everyones best friend until the thing gets fixed.
 
You may not need a new door. Can you post up a picture of the 3 sides of the door so I can see the reveals around the door. I have been working with those darn things for too long. I usually never tell anyone what I actually do because just about everyone has one of those that needs work and you become everyones best friend until the thing gets fixed.
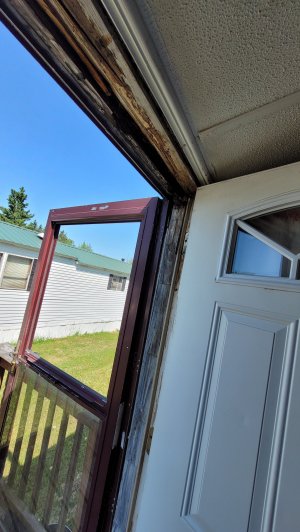
I definitely need a new door, or at least frame. Its all rotted and the weight of the door is causing it to sag so it doesnt line up right like it used too. 20230601_102935.jpg

If i took it apart and shimmed the bottom right, it would put it back in place but i m worried if i pull the screws out to shim it, ill never get it back in place. This trailer is so twisted and warped.
 
Yeah in theory, but my house was built in the 1880s, which is even older than I thought lol, part was added in the 50s. Everything is crooked, house is settling, some windows are original, they're covered by an enclosed porch... but single pane, with the little hole in the sill that I'm told was to let in fresh air for tuberculosis patients lol... old as fuck... that's only 4 though. There's five giant triptic windows that crank out, one that's just a plain giant window, oh and then 10 more upstairs. I dunno, I just know it's gonna be expensive. We had a few doors replaced... talking skeleton key shit, and it was not a wham bam thank you ma'am situation, there was shimming involved and a lot of swearing at levels. We haven't delved into the windows yet, as we've been too poor until recently... we have a few friends in construction and one that owns a window installation company, so when the time comes we'll probably just hire someone. My husband is not the diy type when it comes to stuff like that, his brother got the handy trait though so that's cool... some shit is better left to the professionals... I ain't MacGyvering windows. 🤣
I am pretty lucky because I have the hands and the mind to figure stuff out. I took my whole house down the bear studs room by room and rebuilt everything. I remember I screwed up the electronic ballast down lights in my kitchen twice learning electrical. Garbage disposal got me in trouble, that was one of them. If you have a garbage disposal and a dishwasher they usually plug into the same outlet under the sink. But the garbage disposal has a switch. Well you see there is a small bridge on the side of the duplex you have to cut so electric does not flow thru both legs coming into the outlet. I did not know that so I smoked some electronic ballasts and I had to replace them twice. That was probably the most costly mistake I made. Sure I screwed things up but everything turned out pretty well. It really helped me professionally as well. Doing the work rather than thinking how long it would take put a different prospective on things.
 
I definitely need a new door, or at least frame. Its all rotted and the weight of the door is causing it to sag so it doesnt line up right like it used too. View attachment 5197

If i took it apart and shimmed the bottom right, it would put it back in place but i m worried if i pull the screws out to shim it, ill never get it back in place. This trailer is so twisted and warped.
That looks like a metal clad door so I doubt it is the door itself. The jamb is likely the problem. The bottom of the hinge jamb side probably has a very tight reveal. The easiest way to fix it would be to take the hinge pin out of the bottom hinge and bend the hinge knuckles. There should be 5 knuckles two on one side of the hinge and 3 on the other. Some newer stuff has 6 and some commerical and institutions stuff have 3 or2. Never sold a 2 knuckle hinge in my life but I have seen them. Anyways if you pull the hinge pin and take a cresent wrench you can bend the knuckles in towards each other. You only need to do it about 1/16 of an inch and that should fix the problem because of the distance. Start out by just doing this to the door hinge side. That will take the abuse better than the frame side. Really that frame is probably the problem but that is a whole weekend project to complete.
 
That looks like a metal clad door so I doubt it is the door itself. The jamb is likely the problem. The bottom of the hinge jamb side probably has a very tight reveal. The easiest way to fix it would be to take the hinge pin out of the bottom hinge and bend the hinge knuckles. There should be 5 knuckles two on one side of the hinge and 3 on the other. Some newer stuff has 6 and some commerical and institutions stuff have 3 or2. Never sold a 2 knuckle hinge in my life but I have seen them. Anyways if you pull the hinge pin and take a cresent wrench you can bend the knuckles in towards each other. You only need to do it about 1/16 of an inch and that should fix the problem because of the distance. Start out by just doing this to the door hinge side. That will take the abuse better than the frame side. Really that frame is probably the problem but that is a whole weekend project to complete.
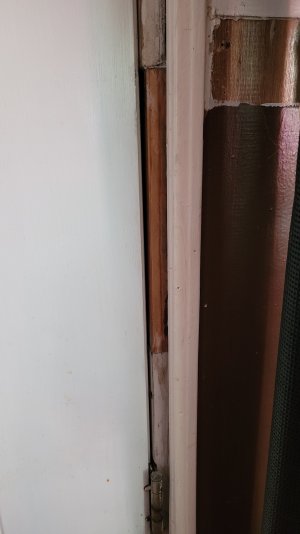
I follow what you're saying, ill try that this weekend. It doesnt help its been cut and cobbed back together too lol. 20230601_105524.jpg
Maybe this summer ill replace the door.
Ive got a bank account with my father in law that has like 600 bucks in it for house repairs, maybe i can get him to let me use it to fix my door.

He made me open an acct with him cause im horrible with money and never have any when something comes up 😆 🤣
 
I follow what you're saying, ill try that this weekend. It doesnt help its been cut and cobbed back together too lol. View attachment 5198
Maybe this summer ill replace the door.
Ive got a bank account with my father in law that has like 600 bucks in it for house repairs, maybe i can get him to let me use it to fix my door.

He made me open an acct with him cause im horrible with money and never have any when something comes up 😆 🤣
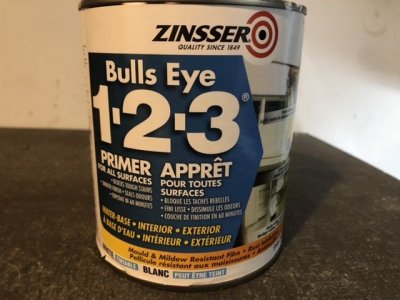
You might want to just wait and replace the whole jamb and casing. See if you can find a local molding and door company what will prefit the jamb to existing hinge and strike locations. If they can you should be able to get the materials for like 200 bucks tops. Stay with finger joint and not any MDF for Jamb and Casing. Also you need to let them know you have the outside security door as well. It looks like you can remove the interior casing and put a new jamb in from the inside. Tools wise you will probably need a screw guy, sawzall, multi tool. Mitre saw and ideally a finish nail gun/compressor but but you can just hand nail. Time consuming but better in the long run. If you go for it, back prime all whole jamb before you install. I always liked the zinsser stuff in a can for that kind of stuff.
 
Last edited:
You might want to just wait and replace the whole jamb and casing. See if you can find a local molding and door company what will prefit the jamb to existing hinge and strike locations. If they can you should be able to get the materials for like 200 bucks tops. Stay with finger joint and not any MDF for Jamb and Casing. Also you need to let them know you have the outside security door as well. It looks like you can remove the interior casing and put a new jamb in from the inside. Tools wise you will probably need a screw guy, sawzall, multi tool. Mitre saw and ideally a finish nail gun/compressor but but you can just hand nail. Time consuming but better in the long run. If you go for it, back prime all whole jamb before you install. I always liked the zinsser stuff in a can for that kind of stuff.
Sweet this is all great info to have, and i have all the tools here for that. I will probably just do the entire door because it looks like someone has kicked it in before... It's split at the latch and bolted back together above and below the door knob.

Sorry for hijacking your thread @TSD, didnt even realize where i was posting all this blabber🤣
That's good advice from Anthem. I'd also invest in some good caulking to seal up all around the door if wind and rain are a thing in your area. Hopefully the damage is in that area only and water hasn't got in and wood rotted any other supporting structure.
 
Yeah we do some stuff, like the damn septic pipe lol. I took apart, sanded and painted all my kitchen cabinets myself, we've torn out carpet, painted a ton of shit, reshingled the porch roof, did a face-lift on the kitchen, tore out nasty tile backsplash and put in sheetrock, we have a friend with the machine to make moldings and he made us some and I stained it... but major construction projects is where the professionals come in lol. Probably going to learn how to resurface all my hardwood floors at some point though.
 
Sweet this is all great info to have, and i have all the tools here for that. I will probably just do the entire door because it looks like someone has kicked it in before... It's split at the latch and bolted back together above and below the door knob.

Sorry for hijacking your thread @TSD, didnt even realize where i was posting all this blabber🤣
No worries, I like the bs chatter lol.
 
Yeah we do some stuff, like the damn septic pipe lol. I took apart, sanded and painted all my kitchen cabinets myself, we've torn out carpet, painted a ton of shit, reshingled the porch roof, did a face-lift on the kitchen, tore out nasty tile backsplash and put in sheetrock, we have a friend with the machine to make moldings and he made us some and I stained it... but major construction projects is where the professionals come in lol. Probably going to learn how to resurface all my hardwood floors at some point though.
I did resurface some floors about 23 years ago. If you have an HD by you see if they rent the 2 sanders you will need to resurface the floors. One is large and on wheels while the smaller one is hand held and does the bulk of the small detail work. You will still need a small hand sander for some of the smaller places. The devil is in the finishing materials. I am not sure what it out there today but that is what makes the finish last and the better the product the longer it should last.
 
I did resurface some floors about 23 years ago. If you have an HD by you see if they rent the 2 sanders you will need to resurface the floors. One is large and on wheels while the smaller one is hand held and does the bulk of the small detail work. You will still need a small hand sander for some of the smaller places. The devil is in the finishing materials. I am not sure what it out there today but that is what makes the finish last and the better the product the longer it should last.
I still have the hand sander I bought to do the cabinets. We had a local hardware store that rented all kinds of tools but they closed recently, bummer. I have a home depot or Lowes but both are about an hour drive. I bet I know someone that owns one. It would be many days of sanding, house is about 2500 square feet and it's all hardwood but the bathrooms. Living room, dining room and upstairs, which is 4 beds (and a bathroom and laundry that are vinyl) and a long hall, are all old ass hardwood. Living room and dining room are in surprisingly good shape because someone put approximately 57 layers of shellac that's probably been long illegal... shiny AF. So I'd take that down and do a darker stain, they're very light. Kitchen was redone probably 15 years ago, but it's just worn from having no topcoat and us just not doing anything other than Murphy’s oil soap. I painted the floors with floor grade paint in my son's room, my room and the spare room in a nice gray, scuffed it up in the shiny spots but it was mostly worn. I did that cause the upstairs floors are a bit uneven and I don't know that it would take well to the big sander even the hand sander didn't go over well. ... I like the look of the paint, but it already needs a touch up... I need to find some kind of topcoat for it. Paint guy said it wouldn't be necessary but he was clearly mistaken lol.
 
You can still get shellac. My guess is someone put down some lacquer on the floor. When you say you have some uneven boards that is a concern and not taking well to a hand sander. The large wheels sander is a beast and I want to say you start out with 40 grit paper so it just really gets after the wood witch might be more of a problem than one realizes.
 
You can still get shellac. My guess is someone put down some lacquer on the floor. When you say you have some uneven boards that is a concern and not taking well to a hand sander. The large wheels sander is a beast and I want to say you start out with 40 grit paper so it just really gets after the wood witch might be more of a problem than one realizes.
Yeah the downstairs ones are not really uneven, just the settling second floor has caused some issues .. and that's why I painted upstairs.
 
When I moved into the downtown loft I had in L.A. I refinished all the floors with the same sanders you mentioned @Anthem275 . One was a heavy duty belt style sander that you pushed along as it sanded. Once the rough sand was done you went back over with progressively finer grits. I also rented a corner sander and finished the details with my hand held orbital sander. The floors were original to the building so they were rough cut oak. They still had oil based shellacs back then so I went with that and the floor came out really nice. The entire loft space was 5,000 sq ft. I did it with my roommate before we put walls up in the space so it was fairly easy. We wore one of those helmet beer can holders as our "safety helmet" and took turns sanding. Every 4 beers we'd switch off.
 
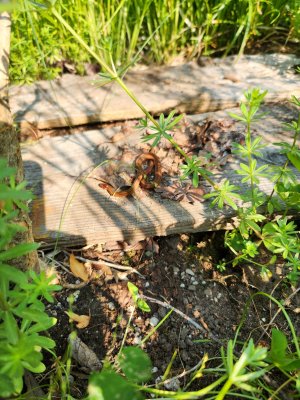
Found this little dude chilling where I needed to plant one of my second location ladies. He had his little burrow right near my hole from last year, so I pushed the hole a bit and covered the entrance slightly with the board, didn't want to evict him after he made his hole to his liking... hopefully he didn't mind my digging and will keep his house under my plant and chase away some critters. 20230602_092126.jpg
Love watching these chunky fuzzy guys collect nectar and pollen... they're currently swarming my blackberry bushes, should be a good berry year. 20230601_092507.jpg
And this one is just funny lol. FB_IMG_1685613145197.jpg
No pics of my plants yet I know. They look like shit. Not sure why other than the hardening, but they should be over that by now and leaves are still showing issues, not messing with anything till a couple weeks when they've settled in well. This is what I get for trying new things lol.
 
Today was dumb, I'm sore and tired. I tried to quickly put up one scrog after work, and got caught in a torrential downpour, tried to hurry, and split the damn stalk. Oh well, hopefully it heals and makes a knuckle. My Iris got taken down by the rain. This nice sunny pic was like 5 minutes before I got poured on lol.View attachment 6132
My blunt came out crooked, but here's the Shaman before I split it like a dumbass... all part of the torture lol.20230608_165446.jpg Shaman also seems to have preflowers, which wtf is that about? Who knows, probably stressed it and I'm sure this didn't help. Would be cool if it flowers normally and doesn't do any weird shit... I'm probably not that lucky. 🤣 I'll take pics of everyone this weekend at some point.
Saw a mom and baby deer on my way home, so that was cool. Rest of the day was crap, hopefully tomorrow is better.20230608_144154.jpg
 
Today was dumb, I'm sore and tired. I tried to quickly put up one scrog after work, and got caught in a torrential downpour, tried to hurry, and split the damn stalk. Oh well, hopefully it heals and makes a knuckle. My Iris got taken down by the rain. This nice sunny pic was like 5 minutes before I got poured on lol.View attachment 6132
My blunt came out crooked, but here's the Shaman before I split it like a dumbass... all part of the torture lol.View attachment 6137 Shaman also seems to have preflowers, which wtf is that about? Who knows, probably stressed it and I'm sure this didn't help. Would be cool if it flowers normally and doesn't do any weird shit... I'm probably not that lucky. 🤣 I'll take pics of everyone this weekend at some point.
Saw a mom and baby deer on my way home, so that was cool. Rest of the day was crap, hopefully tomorrow is better.View attachment 6140
Pre flowers are nothing to worry about i almost always see them
 
It's been a long week, I'm pooped. Got up 2 more scrogs after work today.
Shaman was the one I broke last night, didn't even seem phased and was pointing back to the sky today... I assume because of the way it split, none of the inner bits that supply the arms were damaged, because it split right down the middle. Shaman was the one that did not respond well to topping, it didn't sprout any new growth like you'd expect, but instead just healed and the two arms grew thick... not ideal because now they're big and heavy... hopefully splitting actually helps and a knuckle makes her stronger. She's also the one who seems to be starting flower already, which it shouldn't really be yet based on light... hope we don’t reveg. It has some pistils and they are brown, I assume from my aggressive treatments to kill the thrips... I assume pistils probably don't like sulfur spray.
Whatever man, I have 7 others if this one goes off the rails. I got this strain cause it's a lower thc Sativa dom, 14% I think... for days I just want a little daytime buzz or days I'm feeling anxious and a strong Sativa is a bad idea... so I hope she has something for me at harvest.
Scrog isn't as low as I wanted on this one, but I fucking broke it adjusting it so it's one peg higher than the others. I'll be adjusting continually for a while anyway so maybe I can lower it when she heals, if not, oh well, that's how high I had them all last year. Probably should have put the scrogs up already, they are starting to get thick, this one has the thickest stalk besides Grandmommy Purple, and she's basically already laying down cause of how I planted her so she'll be easy to scrog.. hopefully better luck with the rest. 20230609_175822.jpg20230609_175837.jpg20230609_180021.jpg

Here's the start of the torture on these... Strawberry Lemonade. The small lower stuff should grow up and all the side branches will get spread out as they grow. I'll clean below the scrog and defoliate more eventually, I hacked off a bunch of crisp fans already so I'm not doing much defoliation for a while. This one had quite a few shitty leaves so she's a bit sparse at the moment, but plenty of new growth has started. 20230609_175803.jpg

Mimosa X Orange Punch
20230609_175732.jpg

Looking nice and full already, hubs said "oh no, it's a PUNCH" referring to last year's 30 oz Black Cherry Punch lol. Don't think they have lineage directly in common, but I dunno what Orange Punch came from. She'll need many adjustments. It all just kinda starts to spread out and I stick them in separate holes as they grow. Going to get the other 3 garden gals scrogged this weekend then decide if I want to scrog the other 2... probably won't because I don't go there enough to keep up on it.
If anyone thinks they see PM... it's not, it's sulfur spray... apparently that shit is basically permanent lol. The upper leaves have been well washed by rain, the lower stuff still has some residual sulfur. I'll get pics once they adjust up too... wanted to show how they look at first.

Have my first ripe strawberries of the year, actually remembered to spray with some lost coast ans sprinkle DE and nothing has munched on them yet. 20230609_175613.jpgthat's all for now... might have myself a margarita and a doobie or 3.
 
Phew need to sit for a minute. Got the last of the scrogs up and made some adjustments to the others. Real pain in the ass getting the posts hammered in with all the rock we have... hence why half are crooked. My Swamp Witch Paradise. 20230611_142415.jpg
I'll get a better group shot when everyone is facing upright lol.
Here is Grandmommy Purple, she was planted at quite an angle, so her scrogging was less traumatic... so far. 20230611_142750.jpg20230611_142740.jpg

Cinderella XX is short and stout, and I snapped a big arm when a piece of fence fell on her like a week ago. I have a feeling she will stretch and I can spread her out nicely. 20230611_142337.jpg
Strawberry Lemonade stood up nicely, made a couple adjustments today. All that middle stuff is going to shoot up into the scrog now that it's spread out. She has the most massive leaves of the bunch. 20230611_142301.jpg

Shaman stood up nicely, despite the split. May still try to lower it in a couple weeks, it's at like 20 something inches, the rest are between 12 and 18. I want to leave enough room on the posts to add another level of screen if I decide it would be beneficial, and I want them shorter than last year. 20230611_142037.jpg

LSD just got the scrog on today... Annnnd I, or hubs split her at some point. She was the other one that didn't respond as well to topping and has two main arms, but she's bushing out nicely now, so I guess it worked somewhat. LSD was the worst when we were in pots not loving that stinky compost I used... but she seems to be recovering now. I'll adjust more tomorrow after she's facing up. 20230611_130043.jpg

Mimosa X Orange Punch stood up quickly and had some minor adjustments today. She's still shiny from lost coast. She was my runt for a long time but she's bushing out nicely as well. 20230611_125927.jpg
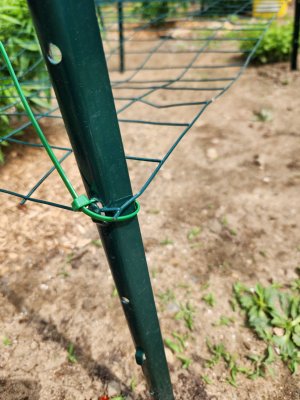
And just a pic of how the fence is attached for @Farmerdave The ziptie is basically just insurance to keep it in place. The wire is behind the nub, squeezed closed with pliers. 20230611_142432.jpg
I clearly don't measure or keep shot orderly... I just wing it. I cut bigger holes in various places to get my arms in for maintenance. Hopefully I can get up to check the other ladies soon... I've maxed out mama free time for the day and the sick boy wants my attention.
Nice beef roast In the oven for dinner, a shower and a smoke and all will be well.
 
Very nice. Orderly and lots of space. That isn’t a kitty litter yellow bucket is it? Looks like one I use. 🤣

Great garden 👍. One day, when I take my training crates off. 😝
I use those buckets for everything... they're super handy... I think that one is full of extra bricks and that's why it's still there. 🤣 20 bucks for litter, you best believe I'm reusing those suckers.
 
Back
Top Bottom